Appearance
说明:当前文档升级内容为v2.7.1升级到v2.7.2
版本升级
升级提示:在开始“版本升级”之前,我们强烈建议您在技术部门同事的指导下进行版本升级。 由于安装过程可能涉及到复杂的配置和系统环境要求,专业指导可以帮助您避免潜在的技术问题,确保升级过程顺利进行。 如果您有任何疑问或需要帮助,请随时联系我们的技术支持团队。
整个升级过程分别以下三步:
- 备份数据
- 升级
- 服务回退【针对升级失败的情况下】
1.备份数据
我们强烈建议以下两种备份数据方式都执行。
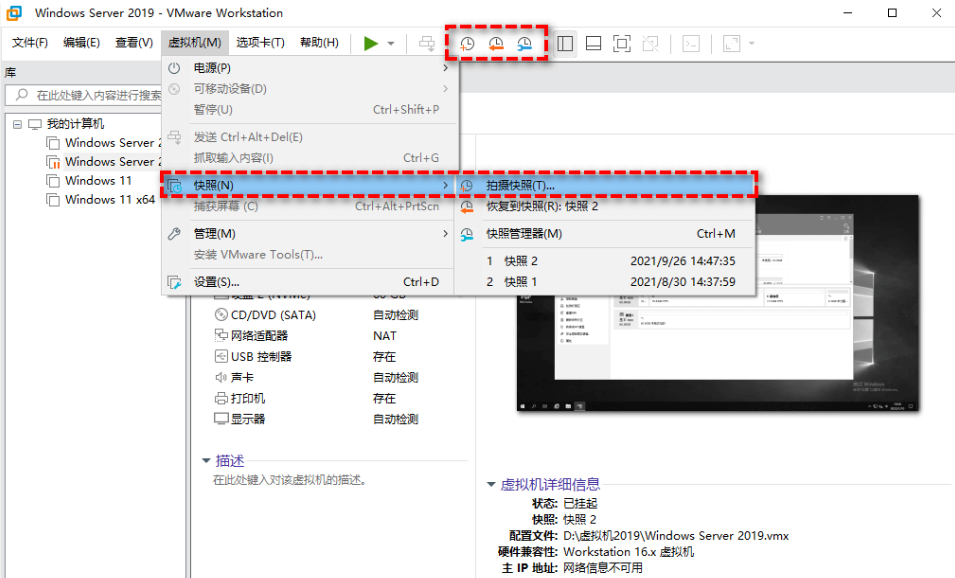
1.1 虚拟机快照备份
不同的虚拟机软件,使用快照功能不一样,以 vmware 为例,如下图所示,进行快照备份。
1.2 数据卷备份:
- 在没有变更挂卷目录的情况下,只需要执行
cp -r /home/chatbot /home/chatbot_back_2.7.0进行备份即可 - 已经变更挂卷目录的情况下,需要将所有的卷目录进行备份。例如:Mysql 的挂卷目录变更为:
/var/lib/data/mysql, 则需要执行命令:cp -r /var/lib/data/mysql /var/lib/data/mysql_back_2.7.0
1.3 docker-compose 文件备份
执行cp docker-compose.yaml docker-compose-v2.7.1.yaml.back备份当前文件
2. 升级
2.1 升级所需资源
在升级之前,需要确保服务器上的可用资源足够。以下是升级所需的资源
可用cpu >=4C  memory>=8G
剩余磁盘空间>20G
2.2 下载更新所需的文件
下载所需的 docker-compose.yaml 文件以及升级的 sql 文件
wget --content-disposition "https://nbagent.ai/api/docs/files?version=v2.7.2&upgrade=true"2.3 更新数据库
更新 Mysql 服务可以通过多种方式进行更新,以下介绍两种常用的方式进行数据库的更新。
可以通过 Mysql 管理工具如
HeiDiSQL等软件,连接 Mysql,通过导入v2.7.2-upgrade.sql脚本,执行升级。如下图所示,通过HeiDiSQL软件升级的图片: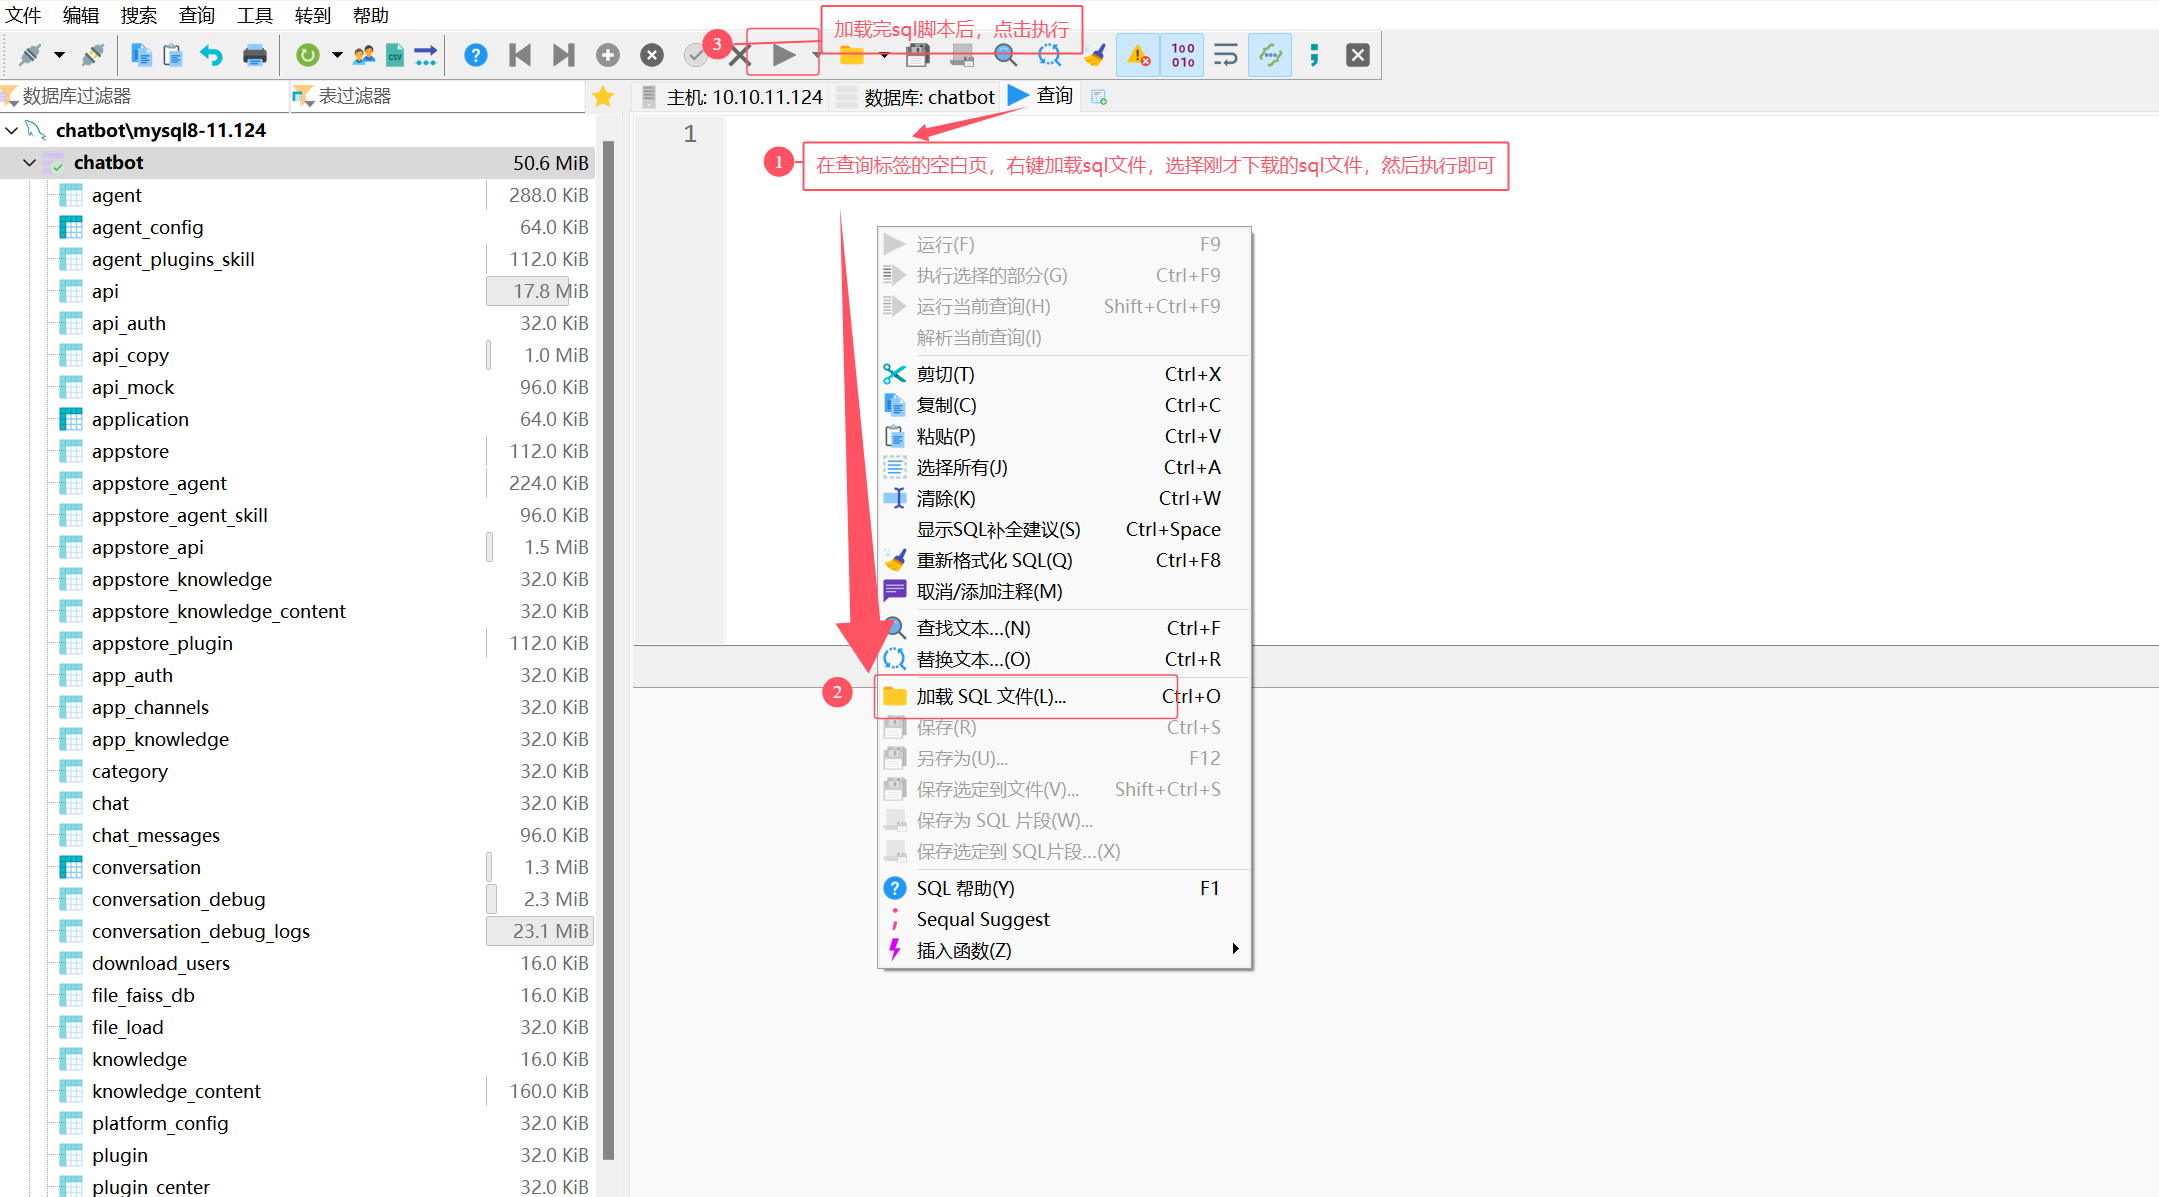
也可以通过容器方式执行升级,以下是通过容器升级方式加载 sql 语句升级。
bash# 1.copy 升级脚本到 mysql 容器中 docker cp v2.7.2-upgrade.sql mysql:/ #2. 进入到容器中 docker exec -it mysql bash #3.设置本次的字符串,并进入到 mysql 命令行中。如果mysql容器本身是utf-8格式则无需设置 echo "export LANG='C.UTF-8'" >> ~/.bashrc ; bash ;echo $LANG mysql -uroot -pyourchatbotpassword #4.在命令行中执行 source /v2.7.2-upgrade.sql当脚本执行全部都 ok,即可说明本次 Mysql 的数据库层面已经升级成功。
2.4 更新服务配置
通过下载最新版本的 docker-compose 文件,对比两个 docker-compose 文件的内容,从而手动修改,进行更新。通过下面的命令下载最新版本的 docker-compose 文件。
bash
wget --content-disposition "https://nbagent.ai/api/docs/files?version=v2.7.2"也可以直接按下面的方式更新 docker-compose.yaml 文件,以下是各个服务更新的具体内容。
chatbot-server 服务
更新镜像到v2.7.2
yamlimage: registry.cn-shenzhen.aliyuncs.com/nb-agent/chatbot-server:v2.7.2-cechatbot-agent 服务
更新镜像到 v2.7.2版本
yamlimage: registry.cn-shenzhen.aliyuncs.com/nb-agent/agent:v2.7.2chatbot-web服务更新
更新镜像到 v2.7.2版本,新增默认语言设定
yamlimage: registry.cn-shenzhen.aliyuncs.com/nb-agent/chatbot-ui:v2.7.2 environment: NEXT_PUBLIC_DEFAULT_LOCALE: "zh-CN"删除robot-agent服务 robot-agent服务内容已移到chatbot-server中,当前服务可以删除
yaml# robot-agent: # image: registry.cn-shenzhen.aliyuncs.com/nb-agent/robot-agent:test.20241119165243 # container_name: robot-agent # ports: # - "7777:8080" # restart: always # environment: # - SPRING_DATASOURCE_URL=jdbc:mysql://192.168.0.42/robot_agent?serverTimezone=UTC # - SPRING_DATASOURCE_USERNAME=root # - SPRING_DATASOURCE_PASSWORD=ctgqwe123456 # - NEBULAAI_HTTP_URL=http://192.168.0.42 # - NEBULAAI_WS_URL=ws://192.168.0.42 # - NEBULAAI_KEY=gYcZzrrEEPFgkazHywJb1Vqo0MMc~新增nbai-graphrag
docker-compose.yaml 复制关于nbai-graphrag和memgraph的服务,配置好相关的环境变量
yamlnbai-graphrag: container_name: nbai-graphrag image: registry.cn-shenzhen.aliyuncs.com/nb-agent/nbai-graphrag:v2.7.2 ports: - "${PORT:-9621}:9621" volumes: - /home/chatbot/graph/data/rag_storage:/app/data/rag_storage - /home/chatbot/graph/data/inputs:/app/data/inputs - /home/chatbot/graph/config.ini:/app/config.ini - /home/chatbot/graph/lightrag:/app/lightrag #- /home/chatbot/graph/.env:/app/.env #env_file: # - .env environment: - HOST=0.0.0.0 - TIKTOKEN_CACHE_DIR=/app/data/tiktoken - OLLAMA_EMULATING_MODEL_TAG=latest - ENABLE_LLM_CACHE=true - RERANK_BINDING=aliyun # 重排序模型类型 - RERANK_BY_DEFAULT=True # 使用默认使用重排序 - RERANK_MODEL=gte-rerank-v2 # 重排序模型 - RERANK_BINDING_HOST=https://dashscope.aliyuncs.com/api/v1/services/rerank/text-rerank/text-rerank # 重排序地址 - RERANK_BINDING_API_KEY=your-apikey # 模型访问的apikey - ENABLE_LLM_CACHE_FOR_EXTRACT=true - SUMMARY_LANGUAGE=Chinese - MAX_ASYNC=4 - MAX_PARALLEL_INSERT=2 - EMBEDDING_FUNC_MAX_ASYNC=8 - EMBEDDING_BATCH_NUM=10 - LLM_MODEL=qwen3-max # 大语言模型的名称 - LLM_BINDING_HOST=https://dashscope.aliyuncs.com/compatible-mode/v1 # 大语言模型的访问地址 - LLM_BINDING_API_KEY=your-apikey # 大语言模型的apikey - LLM_BINDING=openai # 大语言模型的访问方式 - OPENAI_LLM_MAX_COMPLETION_TOKENS=9000 - OLLAMA_LLM_NUM_CTX=32768 # - EMBEDDING_BINDING=azure_openai # - AZURE_EMBEDDING_DEPLOYMENT=text-embedding-3-large # - AZURE_EMBEDDING_API_VERSION=2025-01-01-preview # - AZURE_EMBEDDING_ENDPOINT=https://yourendpoint.openai.azure.com # - AZURE_EMBEDDING_API_KEY=your-apikey - EMBEDDING_BINDING=openai # 向量模型的类别 - EMBEDDING_MODEL=text-embedding-3-large # 向量模型的名称 - EMBEDDING_DIM=3072 - EMBEDDING_BINDING_HOST=https://api.openai.com/v1 # 向量模型的访问地址 - EMBEDDING_BINDING_API_KEY=your_api_key # 向量模型的apikey - OLLAMA_EMBEDDING_NUM_CTX=8192 - LIGHTRAG_KV_STORAGE=RedisKVStorage # 缓存使用存储方式 - LIGHTRAG_VECTOR_STORAGE=MilvusVectorDBStorage # 向量数据库使用存储方式 - LIGHTRAG_GRAPH_STORAGE=MemgraphStorage # 图数据库的使用方式 # 下面是向量数据库的一些配置内容 - MILVUS_URI=http://{your_ip_or_host}:19530 - MILVUS_DB_NAME=graphrag # MILVUS_USER=root # MILVUS_PASSWORD=your_password # MILVUS_TOKEN=your_token # MILVUS_WORKSPACE=yourworkspace # 缓存的配置信息 - REDIS_URI=redis://:Nopassredis^^NexP@{your_ip_or_host}:6379/2 - REDIS_SOCKET_TIMEOUT=30 - REDIS_CONNECT_TIMEOUT=10 - REDIS_MAX_CONNECTIONS=50 - REDIS_RETRY_ATTEMPTS=3 # 图数据库的配置内容 - MEMGRAPH_URI=bolt://{your_ip_or_host}:7687 - MEMGRAPH_USERNAME= - MEMGRAPH_PASSWORD= - MEMGRAPH_DATABASE=memgraph - NBAI_SECRET_KEY=8hW691DzKSHrEG222qYCv1m4rcHRQRbqr4KlaFkjZa0c1 memgraph: image: registry.cn-shenzhen.aliyuncs.com/nb-agent/memgraph-mage:3.7.2 container_name: nbai-memgraph ports: - "7687:7687" - "7444:7444" command: [ "--log-level=TRACE" ] volumes: - memgraph_data:/var/lib/memgraph volumes: memgraph_data:
4. 启动并更新服务
在 docker-compose.yaml 文件所在目录,使用以下命令启动所有服务
docker-compose up -d5. 配置可使用的图谱知识库【Beta版本】
正常运行后,在添加知识库类型时,选择图谱类型是无法添加成功的。还需要进行代理访问,才能够使用。
安装nginx
bashsudo apt install nginx配置代理
- nginx.conf文件需配置支持ws协议. 默认路径:/etc/nginx/nginx.conf
nginxuser www-data; worker_processes auto; pid /run/nginx.pid; error_log /var/log/nginx/error.log; include /etc/nginx/modules-enabled/*.conf; events { worker_connections 768; # multi_accept on; } http { include mime.types; include /etc/nginx/conf.d/*.conf; map $http_upgrade $connection_upgrade { default upgrade; '' close; } log_format main '$remote_addr - $remote_user [$time_local] "$request" ' '$status $body_bytes_sent "$http_referer" ' '"$http_user_agent" "$http_x_forwarded_for"'; access_log /var/log/nginx/access.log main; sendfile on; #tcp_nopush on; keepalive_timeout 65; send_timeout 60; tcp_nodelay on; proxy_read_timeout 600; proxy_connect_timeout 60; proxy_send_timeout 100; client_max_body_size 300M; gzip on; gzip_min_length 1k; gzip_buffers 4 16k; gzip_comp_level 3; gzip_types text/plain text/css application/xml application/javascript application/x-javascript text/javascript; default_type application/octet-stream; access_log /var/log/nginx/access.log; include /etc/nginx/sites-enabled/*; }- 如果/etc/nginx/conf.d不存在,使用命令:
sudo mkdir -p /etc/nginx/conf.d如果default.conf文件不存在,则创建default.conf文件,sudo touch /etc/nginx/conf.d/default.conf。假设您的ip为10.10.13.57(请替换成您自己的ip),default.conf配置如下:
nginxserver { listen 80; server_name localhost 127.0.0.1 10.10.13.57; #access_log /var/log/nginx/host.access.log main; location /api/chat/ws/debug/ { proxy_set_header Host $host; proxy_set_header X-Real-IP $remote_addr; proxy_set_header X-Forwarded-For $proxy_add_x_forwarded_for; proxy_pass http://10.10.13.57:5000/api/chat/ws/debug/; proxy_http_version 1.1; proxy_set_header Upgrade $http_upgrade; proxy_set_header Connection $connection_upgrade; } location /api/chat/ws/ { proxy_set_header Host $host; proxy_set_header X-Real-IP $remote_addr; proxy_set_header X-Forwarded-For $proxy_add_x_forwarded_for; proxy_pass http://10.10.13.57:5000/api/chat/ws/; proxy_http_version 1.1; proxy_set_header Upgrade $http_upgrade; proxy_set_header Connection $connection_upgrade; } location /graph/ { proxy_set_header X-Real-IP $remote_addr; proxy_set_header X-Forwarded-For $proxy_add_x_forwarded_for; proxy_cookie_path / /; proxy_pass http://10.10.13.57:9621/; } location /api/ { proxy_set_header X-Real-IP $remote_addr; proxy_set_header X-Forwarded-For $proxy_add_x_forwarded_for; proxy_cookie_path / /; proxy_pass http://10.10.13.57:5000/api/; } location / { #root /usr/share/nginx/html; #index index.html index.htm; proxy_set_header Upgrade $http_upgrade; proxy_set_header X-Real-IP $remote_addr; proxy_set_header X-Forwarded-For $proxy_add_x_forwarded_for; proxy_set_header X-Forwarded-Host $host; proxy_cookie_path / /; proxy_pass http://10.10.13.57:3000/; } error_page 404 index.html; # redirect server error pages to the static page /50x.html # error_page 500 502 503 504 /50x.html; location = /50x.html { root /usr/share/nginx/html; } }配置完成后,重新加载nginx配置:
sudo nginx -s reload即可通过80端口进行访问,同时也可以使用图谱知识库。例如通过http://10.10.13.57访问。
服务回退
如遇到不可抗拒等因素,导致当前升级失败,可执行服务回退操作。
使用快照恢复旧版本服务。
停止相应的服务,执行数据恢复,然后重新恢复服务:
bash# 停止服务 docker-compose down # 将备份数据恢复 cp -r /home/chatbot_back_2.7.0 /home/chatbot cp docker-compose-v2.7.1.yaml.back docker-compose.yaml # 重新启动服务 docker-compose up -d